Showing posts with label Articles. Show all posts

Tuesday, May 6, 2025

thumbnail

To make beautiful hair and create an image of it, there are two parts:


🌟 Part 1: How to Make Your Hair Beautiful (Real Life Tips)

Here are some general tips for naturally healthy, beautiful hair:


1. Healthy Hair Care Routine

  • Shampoo 2-3 times a week with sulfate-free products.

  • Conditioner every wash, focusing on ends.

  • Use leave-in conditioner or hair serum for shine and smoothness.

2. Hair Mask / Oil Treatment

  • Use coconut oil, argan oil, or olive oil once a week.

  • DIY hair masks:

    • Avocado + honey + yogurt

    • Egg + olive oil

3. Heat Protection

  • Minimize heat styling.

  • Always apply heat protectant spray before using straighteners or curlers.

4. Haircut & Style

  • Regular trims every 6-8 weeks to avoid split ends.

  • Try layers, bangs, or soft curls for added volume.

5. Healthy Diet

  • Eat foods rich in protein, biotin, omega-3, and vitamin E.

  • Drink plenty of water.

6. Bonus Tips

  • Use satin pillowcases.

  • Don’t brush wet hair aggressively.

  • Avoid tight hairstyles that pull hair too much.


Wednesday, April 30, 2025

thumbnail

Javascript for scraping video from Kuaishou

 When developing a Chrome extension to automatically extract and download videos from platforms like KuaiShou, one of the biggest challenges is dealing with unresponsive or invalid video cards.

Sometimes, a video card is clicked, but no video loads. This results in failed downloads and an incomplete automation cycle.

In this article, we’ll explain how to handle this edge case by adding a retry mechanism that reloads the card and attempts to extract the video again—all without refreshing the entire page.


Contact me on Telegram : @leavponlork

Monday, February 11, 2019

thumbnail

Create local chatroom with java using socket

Hello every one in this video I will show you how to create local chat room in java. In this article I used socket by create socket object. follow my source code :
for Server Side :

package Ex1;
import java.awt.*;
import javax.swing.*;
import java.awt.event.*;
import java.net.*;
import java.io.*;
public class server extends JFrame implements Runnable
{
ServerSocket ss;
Socket s[];
Thread t[];
BufferedReader br[];
PrintWriter pw[];
String st;
int num=0;
public server()
    {

    //setLayout(newFlowLayout(0));
    s=new Socket[10];
    t=new Thread[10];
    br=new BufferedReader[10];
    pw=new PrintWriter[10];
   try  {ss=new ServerSocket(5);
    while(true)
        {
        s[num]=ss.accept();
        br[num]=new BufferedReader(new InputStreamReader(s[num].getInputStream()));
        pw[num]=new PrintWriter(s[num].getOutputStream(),true);
        t[num]=new Thread(this);
        t[num].start();
        System.out.println(num+" Enter the room");
        num++;
        }

    }
  catch(Exception ee)
    {
    System.out.println("1"+ee);
    }
    }
public void run()
    {
  try   {
    while(true)
    {
    for (int i=0;i<num;i++)
        {
        if(Thread.currentThread()==t[i]) 
            {
            st=br[i].readLine();
            char c[]=st.toCharArray();
            String su=""+c[0];
            int cl=Integer.parseInt(su);
            System.out.println(cl);
            int k=i+1;
            if(cl==0)
            {
                for(int j=0;j<num;j++)
                    {
                   
                    pw[j].println("Client "+k+": : :"+st);
                   
                    }
            }
            else
            {
                pw[cl-1].println("Client "+k+": : :"+st);
            }
            }
        }
    }
    }
  catch(Exception ee)
    {
    System.out.println(ee);
    }
    }
public static void main(String arg[])
    {
    new server();
    }
}


Client Side

package Ex1;

import java.awt.*;
import javax.swing.*;
import java.io.*;
import java.net.*;
import java.awt.event.*;
public class client extends JFrame implements ActionListener
{
/**
* 
*/
private static final long serialVersionUID = 1L;
Socket s;
BufferedReader br;
PrintWriter pw;
String st,st1,st2;
JTextArea ta;
JTextField tf,tf1;
JButton b1;
public client()
    {
     try    {
    setLayout(new FlowLayout(0));
    ta=new JTextArea(10,25);
    add(ta);
    tf1=new JTextField(5);
    add(tf1);
    tf=new JTextField(25);
    add(tf);
    b1=new JButton("Send");
    add(b1);
    b1.addActionListener(this);
    setVisible(true);
    setSize(300,275);
    setTitle("Client");
    s=new Socket("localhost",5);
    pw=new PrintWriter(s.getOutputStream(),true);
    br=new BufferedReader(new InputStreamReader(s.getInputStream()));
    while(true)
        {
        st2=br.readLine();
        ta.append("\n"+st2);
        }
    }
    catch(Exception ex)
    {
    System.out.println(ex);
    }
    }
public void actionPerformed(ActionEvent ee)
    {
    if(ee.getSource()==b1)
        {
    try {
                    st1=tf1.getText();
        st=tf.getText();
        ta.append("\n"+st);
        pw.println(st1+st);
         
        }
     catch(Exception ex)
        {
        System.out.println(ex);
        }
        }
    }
public static void main(String arg[])
    {
    new client();
    }
}


Monday, September 24, 2018

thumbnail

Useful Windows 10 Shortcuts You Should Be Using

The best way to use a Windows laptop or PC is through the various keyboard shortcuts. In this video, we show you 10 useful Windows shortcuts that will definitely speed up your working on Windows while making you a keyboard ninja. These are simple Windows keyboard shortcuts, and tricks that aren't very well known.


Win + Tab = Show Create New Desktop
Win + 1,2,3,4,5.... Open App on task bar
Win + A = Notification Center
Win + D = Show/ Hide Desktop
Win + E = Open File Explore
Win + H = Open share carmp
Win + I = Windows Setting
Win + L = Lock PC/ Account(c)
Win + S = Search Box
Win + , = Peek at Desktop
Win + Ctrl + Enter = Open Narrator
Win + P = open Project
Win + U = Open Setting
Win + G = Open Game Bar/ Record Screen
Win + X = Open Windows Panel
Win + B = Use Arrow Key switch Icon notification Bar
Win + M = Hide Activity
Win + K = Open Connection Device
Win +W  = Open Windows INC for draw and capture screen
Win +R = Open Run box
Win + T = Select App in Pin TaskBar
Win + ; Or . = Open emo keyboard
Win + + = Open magnifier(Use Win + (+,-) to zoon in/ zoom out)
Win + ! = Switch Explore File Video
 

Sunday, September 23, 2018

thumbnail

Top shortcut of blogger that we need to know!

        Bloggers perpetually seek for new tricks and tweaks associated with blogging and that we stick with it serving to you therein by sharing a number of the impressive tricks and tweaks of Bloggers. Keeping a similar trend on, we tend to square measure sharing some helpful keyboard shortcuts that not solely save some time however would build the task heap easier. These keyboard shortcuts can assist you call at easing your work and you'll perform completely different variety of task in seconds with the assistance of those keyboard shortcuts. during this article, we'll show you nineteen helpful keyboard shortcuts for Blogger post editor.
 here are the list of these awesome keyboard shortcuts which you can use on Blogger and ease out your work.


thumbnail

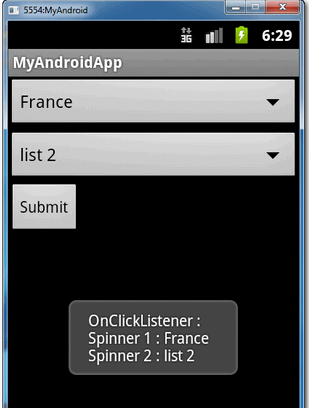
Create Android spinner (drop down list) example


In this posted we show you how to do the following this:

1-Render a Spinner in XML, and load the selection items via XML file also.
2-Render another Spinner in XML, and load the selection items via code dynamically.
3-Attach a listener on Spinner, fire when user select a value in Spinner.
4-Render and attach a listener on a normal button, fire when user click on it, and it will display selected value of Spinner.
1. First we need to create list of items in spinner
 Open folder " res/values/strings.xml" file, and we need to definde the list of items
 
strings.xml file


<?xml version="1.0" encoding="utf-8"?>
<resources>

    <string name="app_name">MyAndroidApp</string>
    <string name="country_prompt">Choose a country</string>

    <string-array name="country_arrays">
        <item>Thai</item>
        <item>United States</item>
        <item>Indonesia</item>
        <item>France</item>
        <item>Italy</item>
        <item>Singapore</item>
        <item>New Zealand</item>
        <item>India</item>
    </string-array>

</resources>
2 . Spinner (DropDown List)

Open folder "res/layout/main_activity.xml" and add spinner and button
1. "spinner1”, the “android:entries” represents the selection items in spinner.
2. “spinner2”, the selection items will be defined in code later.

  Open folder "res/layout/main_activity.xml" add the code below :

<?xml version="1.0" encoding="utf-8"?>
<LinearLayout xmlns:android="http://schemas.android.com/apk/res/android"
    android:layout_width="fill_parent"
    android:layout_height="fill_parent"
    android:orientation="vertical" >

    <Spinner
        android:id="@+id/spinner1"
        android:layout_width="match_parent"
        android:layout_height="wrap_content"
        android:entries="@array/country_arrays"
        android:prompt="@string/country_prompt" />

    <Spinner
        android:id="@+id/spinner2"
        android:layout_width="match_parent"
        android:layout_height="wrap_content" />

    <Button
        android:id="@+id/btnSubmit"
        android:layout_width="wrap_content"
        android:layout_height="wrap_content"
        android:text="Submit" />

</LinearLayout>


3. In MainActivity.java

package com.spinner.example.android;

import java.util.ArrayList;
import java.util.List;
import android.app.Activity;
import android.os.Bundle;
import android.view.View;
import android.view.View.OnClickListener;
import android.widget.ArrayAdapter;
import android.widget.Button;
import android.widget.Spinner;
import android.widget.Toast;

public class MainActivity extends Activity {

  private Spinner spinner1, spinner2;
  private Button btnSubmit;

  @Override
  public void onCreate(Bundle savedInstanceState) {
 super.onCreate(savedInstanceState);
 setContentView(R.layout.main);

 addItemsOnSpinner2();
 addListenerOnButton();
 addListenerOnSpinnerItemSelection();
  }

  // add items into spinner dynamically
  public void addItemsOnSpinner2() {

 spinner2 = (Spinner) findViewById(R.id.spinner2);
 List<String> list = new ArrayList<String>();
 list.add("list 1");
 list.add("list 2");
 list.add("list 3");
 ArrayAdapter<String> dataAdapter = new ArrayAdapter<String>(this,
  android.R.layout.simple_spinner_item, list);
 dataAdapter.setDropDownViewResource(android.R.layout.simple_spinner_dropdown_item);
 spinner2.setAdapter(dataAdapter);
  }

  public void addListenerOnSpinnerItemSelection() {
 spinner1 = (Spinner) findViewById(R.id.spinner1);
 spinner1.setOnItemSelectedListener(new CustomOnItemSelectedListener());
  }

  // get the selected dropdown list value
  public void addListenerOnButton() {

 spinner1 = (Spinner) findViewById(R.id.spinner1);
 spinner2 = (Spinner) findViewById(R.id.spinner2);
 btnSubmit = (Button) findViewById(R.id.btnSubmit);

 btnSubmit.setOnClickListener(new OnClickListener() {

   @Override
   public void onClick(View v) {

     Toast.makeText(MyAndroidAppActivity.this,
  "OnClickListener : " + 
                "\nSpinner 1 : "+ String.valueOf(spinner1.getSelectedItem()) + 
                "\nSpinner 2 : "+ String.valueOf(spinner2.getSelectedItem()),
   Toast.LENGTH_SHORT).show();
   }

 });
  }
}


Custom Select item


package com.spinner.example.android;

import android.view.View;
import android.widget.AdapterView;
import android.widget.AdapterView.OnItemSelectedListener;
import android.widget.Toast;

public class CustomOnItemSelectedListener implements OnItemSelectedListener {

  public void onItemSelected(AdapterView<?> parent, View view, int pos,long id) {
 Toast.makeText(parent.getContext(), 
  "OnItemSelectedListener : " + parent.getItemAtPosition(pos).toString(),
  Toast.LENGTH_SHORT).show();
  }

  @Override
  public void onNothingSelected(AdapterView<?> arg0) {
 // TODO Auto-generated method stub
  }

}

4 Run Our App


Monday, September 17, 2018

thumbnail

How to add Header in Listview Android?

In this posted I will talking about how to customize Header of ListView in android. I really tired to find more examples today I have solution to customize header of listview. let's start

Create new project in android studio.


and here is my code :
1. Create Custom Header layout

<?xml version="1.0" encoding="utf-8"?><LinearLayout xmlns:android="http://schemas.android.com/apk/res/android"    xmlns:tools="http://schemas.android.com/tools"    android:layout_width="match_parent"    android:layout_height="wrap_content"    android:background="#4333"    android:orientation="vertical">

    <TextView        android:id="@+id/txtheader_excel_item"        android:layout_width="match_parent"        android:layout_height="match_parent"        android:layout_marginLeft="5dp"        android:layout_marginStart="5dp"        android:paddingTop="5dp"        android:paddingBottom="5dp"        android:text="Function for Math"        android:textAllCaps="false"        android:textColor="@android:color/black"        android:textSize="18sp"        android:textStyle="bold"        tools:layout_editor_absoluteX="101dp"        tools:layout_editor_absoluteY="2dp" />
</LinearLayout>

and next I create One Class call ExcelFragment extends from Fragment
import android.app.SearchManager;
import android.content.Context;
import android.content.Intent;
import android.os.Bundle;
import android.support.annotation.NonNull;
import android.support.annotation.Nullable;
import android.support.v4.app.Fragment;
import android.view.LayoutInflater;
import android.view.Menu;
import android.view.MenuInflater;
import android.view.View;
import android.view.ViewGroup;
import android.widget.AdapterView;
import android.widget.ListView;
import android.widget.SearchView;
import android.widget.Toast;

import org.greenrobot.eventbus.EventBus;
import org.greenrobot.eventbus.Subscribe;
import org.greenrobot.eventbus.ThreadMode;

import java.util.ArrayList;
import java.util.List;
import android.widget.Filter;

public class ExcelFragment extends Fragment {

    ListView listView;
    TwoTextArrayAdapter adapter;
    @Override    public void onCreate(@Nullable Bundle savedInstanceState) {
        super.onCreate(savedInstanceState);
        items = new ArrayList <>();
        items.add(new Header("រូបមន្ត គណិតវិត្យា",getContext()));
        items.add(new ListItem("០១- ", "រូបមន្ត កូស៊ីនីស",getActivity()));
        items.add(new ListItem("០២-", "រូបមន្ត កូតង់សង់",getActivity()));
        items.add(new ListItem("០៣-", "រូបមន្ត ស៊ីនីស",getActivity()));
        items.add(new ListItem("០៤-", "រូបមន្ត ត្រីកោណមាត្រ",getActivity()));
        items.add(new Header("រូបមន្ត ស្វីតនព្ធន្ត",getContext()));
        items.add(new ListItem("Text 5", "Rabble rabble",getActivity()));
        items.add(new ListItem("Text 6", "Rabble rabble",getActivity()));
        items.add(new ListItem("Text 7", "Rabble rabble",getActivity()));
        items.add(new ListItem("Text 8", "Rabble rabble",getActivity()));
        items.add(new Header("Header 3",getContext()));
        items.add(new ListItem("Text 9", "Rabble rabble",getActivity()));
        items.add(new ListItem("Text 10", "Rabble rabble",getActivity()));
        items.add(new ListItem("Text 11", "Rabble rabble",getActivity()));
        items.add(new ListItem("Text 12", "Rabble rabble",getActivity()));


    }
//Required Constructor    public ExcelFragment(){}

    @Nullable    @Override    public View onCreateView(@NonNull LayoutInflater inflater, @Nullable ViewGroup container, @Nullable Bundle savedInstanceState) {

        View v = inflater.inflate(R.layout.fragment_excel,container,false);
      //  excelList = new ArrayList <HashMap<String, String>>();        listView =(ListView)v.findViewById(R.id.list_excel_lesson);

        //Set Adapter for list        adapter = new TwoTextArrayAdapter(getActivity(), items);

        listView.setAdapter(adapter);

        listView.setOnItemClickListener(new AdapterView.OnItemClickListener() {
            @Override            public void onItemClick(AdapterView <?> adapterView, View view, int position, long l) {
                Intent intent = new Intent(getContext(),SearchResultsActivity.class);
                startActivity(intent);
            }
        });
        return v;
    }


    }


Fragment Excel Layout  fragment_excel.xml

<?xml version="1.0" encoding="utf-8"?><LinearLayout    xmlns:android="http://schemas.android.com/apk/res/android"    xmlns:tools="http://schemas.android.com/tools"    android:layout_width="match_parent"    android:orientation="vertical"    android:layout_height="match_parent">

    <ListView        android:id="@+id/list_excel_lesson"        android:layout_width="match_parent"        android:layout_height="match_parent"        />
</LinearLayout>


Interface Item

import android.view.LayoutInflater;
import android.view.View;

public interface Item {
    public int getViewType();
    public View getView(LayoutInflater inflater, View convertView);
}


Class TwoTextArrayAdapter.java

import android.content.Context;
import android.support.annotation.NonNull;
import android.view.LayoutInflater;
import android.view.View;
import android.view.ViewGroup;
import android.widget.ArrayAdapter;

import java.util.List;

public class TwoTextArrayAdapter extends ArrayAdapter<Item> {
    private static final int TYPE_ITEM = 0;
    private static final int TYPE_SEPARATOR = 1;
    private LayoutInflater mlaInflater;
    public enum RowType{
        LIST_ITEM,HEADER_ITEM    }
    public TwoTextArrayAdapter(@NonNull Context context, @NonNull List<Item> objects) {
        super(context, 0, objects);
        mlaInflater = LayoutInflater.from(context);
    }

    @Override    public int getViewTypeCount() {
        return RowType.values().length;

    }

    @Override    public int getItemViewType(int position) {
        return getItem(position).getViewType();
    }

    @Override    public View getView(int position, View convertView, ViewGroup parent) {

        ViewHolder holder = null;
        int rowType = getItemViewType(position);
        View View;
        if (convertView == null) {
            holder = new ViewHolder();
            switch (rowType) {
                case TYPE_ITEM:
                    convertView = mlaInflater.inflate(R.layout.list_ex_item, null);
                    holder.View=getItem(position).getView(mlaInflater, convertView);
                    break;
                case TYPE_SEPARATOR:
                    convertView = mlaInflater.inflate(R.layout.header_excel_item, null);
                    holder.View=getItem(position).getView(mlaInflater, convertView);
                    break;
            }
            convertView.setTag(holder);
        }
        else        {
            holder = (ViewHolder) convertView.getTag();
        }
        return convertView;
        //return getItem(position).getView(mlaInflater, convertView);    }

    public static class ViewHolder {
        public  View View; }

}

In MainActivity.java I create one method to add fragment


private void loadFragment(Fragment fragment) {
    FragmentTransaction transaction = getSupportFragmentManager().beginTransaction();
    transaction.replace(R.id.mycontianer, fragment);
    transaction.addToBackStack(null);
    transaction.commit();
}

In onCreate method I add loadFragment to load item by default 

       loadFragment(new ExcelFragment());


activity_main.xml

<FrameLayout    android:id="@+id/mycontianer"    android:layout_width="match_parent"    android:layout_height="0dp"
    app:layout_behavior="@string/appbar_scrolling_view_behavior"    app:layout_constraintBottom_toTopOf="@+id/bottomNavigation"    app:layout_constraintEnd_toEndOf="parent"    app:layout_constraintStart_toStartOf="parent"    app:layout_constraintTop_toBottomOf="@+id/TopNavigation"    tools:ignore="MissingConstraints">


</FrameLayout>


Let's run

Thursday, August 9, 2018

thumbnail

How to make Ubuntu look like mac OS X

In this posted we will talking about how to customize Ubuntu 17.10 look like Mac OSX. I'm really tired to boot new OSX to my computer because my computer hardware does not support with Apple product. the Mac Book Pro or Mac Book Air it very expensive, so I try to find other ways to make my computer look like Mac OSX in other ways I decided to use Ubuntu 17.10 with my computer. Now I can make my Ubuntu desktop look pretty! it too easy to do it.


How to make Ubuntu look like a Mac OSX? 

Here is my Ubuntu 17.10 user interface


    Now let's start to make our Ubuntu look like a Mac

 1. Docky mode 

Ok so now we start with our terminal  to open the terminal just  (Shift + Alt + T) and write the command line follow this command:


after terminal opened you must login as root user just type command

 sudo -i  and then enter your root password. Next type this command line

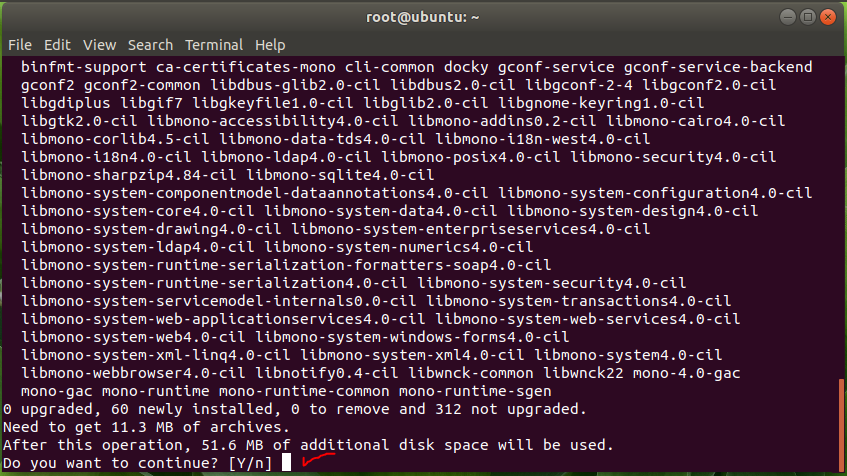
add-apt-repository ppa:docky-core/stable && apt-get update


   To confirmation this package just hit enter key.

Next type this command

apt-get purge docky
apt-get install docky


Press Y to Continue wait to installation completed.

2. Download Theme, icons, And cursor of Mac 

sudo add-apt-repository ppa:noobslab/macbuntu

Update your package

sudo apt-get update

Install Mac OSX icons 

sudo apt-get install macbuntu-os-icons-v10

Install Mac OSX Theme 

sudo apt-get install macbuntu-os-ithemes-lts-v10

3.Replace 'Ubuntu Desktop' text with 'Mac' on the Panel

cd && wget -O Mac.po http://drive.noobslab.com/data/Mac/change-name-on-panel/mac.po


4.Albert Spotlight (Alternative to Mac Spotlight)

sudo add-apt-repository ppa:noobslab/macbuntu

Press Y to confirm and hit Enter Key

sudo apt-get update
sudo apt-get install albert

5.Enter following commands to install Apple Logo

wget -O launcher_bfb.png http://drive.noobslab.com/data/Mac/launcher-logo/apple/launcher_bfb.png sudo mv launcher_bfb.png /usr/share/unity/icons/

After we type this command it will logout from root user don't worry 

6: Unity Tweak Tool to change Themes & Icons

sudo apt-get install unity-tweak-tool
sudo apt-get install gnome-tweak-tool

7: Install Monochrome icons for Libreoffice

sudo apt-get install libreoffice-style-sifr

After installation go to LibreOffice menu select "Tools" - "Options" - "LibreOffice" - "View" and select "Sifr" under "Icon size and style". See following screenshots


install compizconfig-settings-manager

sudo apt-get install compizconfig-settings-manager
sudo apt-get install compiz-plugins compiz-plugins-extra
sudo apt-get install gconf-editor


To completed configuration please watch this video 

Wednesday, August 8, 2018

thumbnail

Install Ubuntu 17.10 Artful Aardvark with VMware Player workstation on Windows 10

            In this post we will discus about how to install Ubuntu 17.10 in VMWare Player sometime may you can't find how to do that so today I will show you step by step how to do it. before we start with it maybe you need to know what is Ubuntu? Some people that use Windows Operating System always feeling difficult with Linux Distributed, So now what is Ubuntu? Ubuntu is a complete Linux operating system, freely available with both community and professional support.that software tools should be usable by people in their local language and despite any disabilities, and that people should have the freedom to customize. Okay so now we start to install Ubuntu:


  1. Download Ubuntu Ubuntu iso image  and free VMWare  vmware player
  2. Install VMware and run on it. 
   
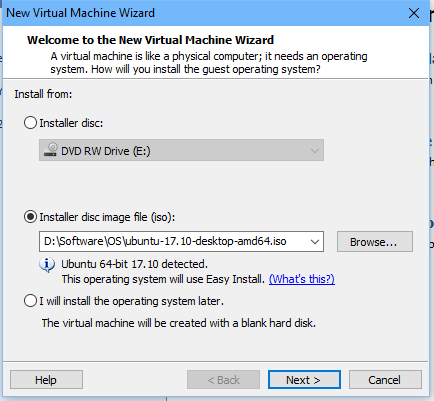
    3. Select Create a New Virtual Machine
    4. Select "iso image file" downloaded


  You should see that it will use Easy Install – this takes care of most of the hard work for you.              Click next.

     5. Enter your Full Name, username, and password and hit next button.


    6. Select the most disk size and sort. Unless you’re coming up with on some very electronic equipment intensive work within the VM, choose the “Split virtual disk into multiple files” possibility. Hit next once you’re proud of the settings.


    7. Click "Customize Hardware"


8. In the hardware choices section choose the number of memory you wish the VM to use. during this instance I’ve gone for 2GB out of the 8GB put in in my laptop computer it's depend on your Computer memory. Leave everything else because it is and click close .


   9. Click Finish


   10. Ubuntu will install, keep wait...


After finished it show :


Ok Next click Install button


Click Continue. 
If you have a reliable and stable Internet connection, then select the box to Download updates while installing Ubuntu as well as to install third-party software for graphic and Wi-Fi, MP3 and other media.


choose to Erase disk and install Ubuntu. This choices is that the default and it erases all knowledge and program on the disk before putting in Ubuntu.


Choosing the choice on top of can prompt you with the screen below to substantiate that you simply need to delete everything on the disk and install Ubuntu on that, click Continue.


Next choose your time zone on the map


Next choose the keyboard layout and click Continue


And then type your full name and your computer name, password and click Continue


Wait installation Completed


And after next Click Reboot Now


Ok let's join with Ubuntu Artful Aardvark Desktop.


Sunday, August 5, 2018

thumbnail

Integrating Google Admob Banner and Interstitial ads With Eclipse ADT

In this post we will talking about how to integrate AdMob in Android application with banner using Eclipse. with our example we will add admob banner on the top of our application by using ads test unite id, we will complete run this example so now let's start with eclipse IDE and following step by step :

Before we create project in eclipse we need to sign in your Admob account and create unite ads as banner. (ca-app-pub-6593689845821813/9312087245)

Get Google-Play-Service library 

make sure your Android SDK(System Development Kite) has been installed google play service in android manage. Open your eclipse tool and go to
1-  Windows  > Android SDK Manage


2- After completed install the project will download in to C:\Users\<User Name>\android-sdks\extras\google\google_play_services\libproject for Windows OS.

3- Import File>Import browse to  google play-service in extra folder  to your project work space follow with this :


Click Next it will popup like :


it will show google-play-service project folder in your current project work space. and next step we need to add google-play-service to our library follow this step: 

4- Right click on your Project go to Property of your project 


By Click Add button it will show 


Then click OK>Apply>OK

Now we go to our project in activity main.xml I create ads and assign id call @+id/adsview1

<com.google.android.gms.ads.AdView
   android:id="@+id/adsview1"
   android:layout_width="wrap_content"
   android:layout_height="wrap_content"
   android:layout_centerHorizontal="true"
   android:layout_alignParentBottom="true"
   ads:adSize="SMART_BANNER"
   ads:adUnitId="@string/banner_ad_unit_id">
</com.google.android.gms.ads.AdView> 


AdMob provides test ad unit id for application development mode. After development we need to use actual ad unit id for your application.
Now we add banner UnitId in strings.xml


<string name="banner_ad_unit_id">ca-app-pub-3940256099942544/6300978111</string>
    
Android Manifest.xml add permissions meta data tag and Activity

Add Permissions 


<uses-permission android:name="android.permission.INTERNET"/>
<uses-permission android:name="android.permission.ACCESS_NETWORK_STATE"/> 
    
Add meta data 

<meta-data android:name="com.google.android.gms.version"
        android:value="@integer/google_play_services_version" /> 
Add Activity Class


<activity android:name="com.google.android.gms.ads.AdActivity"
   android:configChanges="keyboard|keyboardHidden|orientation|screenLayout|uiMode|screenSize|smallestScreenSize"
   android:theme="@android:style/Theme.Translucent" /> 
Full Android Manufest.xml


<?xml version="1.0" encoding="utf-8"?>
<manifest xmlns:android="http://schemas.android.com/apk/res/android"
    package="com.example.grouprttcadmob"
    android:versionCode="1"
    android:versionName="1.0" >

    <uses-sdk
        android:minSdkVersion="8"
        android:targetSdkVersion="21" />
<uses-permission android:name="android.permission.INTERNET"/>
<uses-permission android:name="android.permission.ACCESS_NETWORK_STATE"/> 
    <application
        android:allowBackup="true"
        android:icon="@drawable/ic_launcher"
        android:label="@string/app_name"
        android:theme="@style/AppTheme" >
        <activity
            android:name=".MainActivity"
            android:label="@string/app_name" >
            <intent-filter>
                <action android:name="android.intent.action.MAIN" />

                <category android:name="android.intent.category.LAUNCHER" />
            </intent-filter>
        </activity>
        
        <meta-data android:name="com.google.android.gms.version"
        android:value="@integer/google_play_services_version" />
        <activity android:name="com.google.android.gms.ads.AdActivity"
            android:configChanges="keyboard|keyboardHidden|orientation|screenLayout|uiMode|screenSize|smallestScreenSize"
            android:theme="@android:style/Theme.Translucent" />
    </application>

</manifest>

Now we back to our activity_main.xml in this code it very important to add the code like below in our layout

xmlns:ads="http://schemas.android.com/apk/res-auto
So you can put ads on you activity

<com.google.android.gms.ads.AdView
        android:id="@+id/adView"
        android:layout_width="wrap_content"
        android:layout_height="wrap_content"
        ads:adSize="BANNER"
        ads:adUnitId="@string/ads_banner_unitId" />

In MainActivity class


public class MainActivity extends Activity {
    Utility utility;
    @Override
    protected void onCreate(Bundle savedInstanceState) {
  super.onCreate(savedInstanceState);
  setContentView(R.layout.activity_main);
  setBodyText();
  utility = new Utility(this);
  utility.setLayoutForSmartBanner();
  //Display smart banner ads
                AdView mAdView = (AdView) findViewById(R.id.adView);
                AdRequest adRequest = new AdRequest.Builder().build();
                mAdView.loadAd(adRequest);
    }
    @Override
    public boolean onCreateOptionsMenu(Menu menu) {
           getMenuInflater().inflate(R.menu.menu_main, menu);
           return true;
    }
}


MYMEMO. Powered by Blogger.